Installing Cody in VS Code
Learn how to use Cody and its features with the VS Code editor.
The Cody extension by Sourcegraph enhances your coding experience in VS Code by providing intelligent code suggestions, context-aware autocomplete, and advanced code analysis. This guide will walk you through the steps to install and set up Cody within your VS Code environment.

Prerequisites
- You have the latest version of VS Code installed
- You have a Free or Pro account via Sourcegraph.com or a Sourcegraph Enterprise account
Install the VS Code extension
Follow these steps to install the Cody AI extension for VS Code:
- Open VS Code editor on your local machine
- Click the Extensions icon in the Activity Bar on the side of VS Code, or use the keyboard shortcut
Cmd+Shift+X(macOS) orCtrl+Shift+X(Windows/Linux) - Type Cody AI in the search bar and click the Install button
- After installing, you may be prompted to reload VS Code to activate the extension
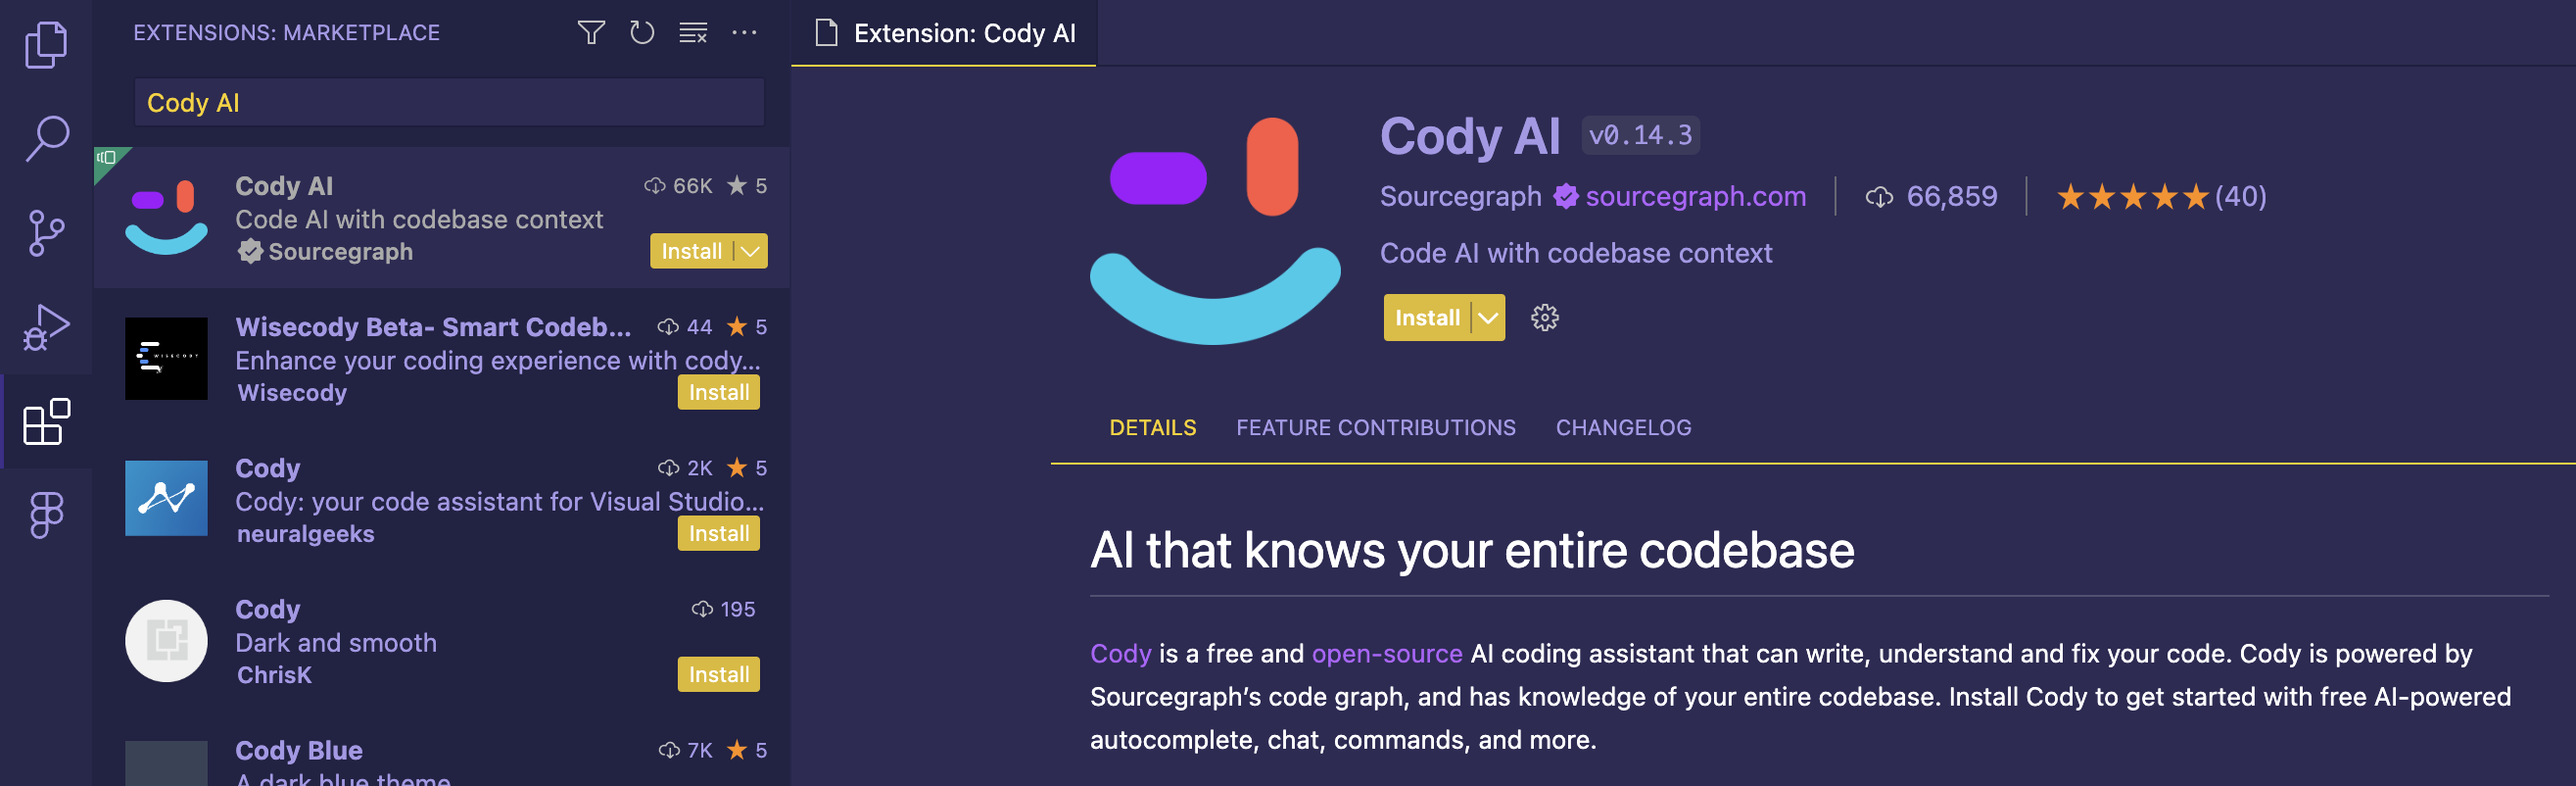
Alternatively, you can also download and install the extension from the VS Code Marketplace directly.
Connect the extension to Sourcegraph
After a successful installation, the Cody icon appears in the Activity sidebar.
Cody Free or Cody Pro Users
Cody Free and Cody Pro users can sign in to their Sourcegraph.com accounts through GitHub, GitLab, or Google.
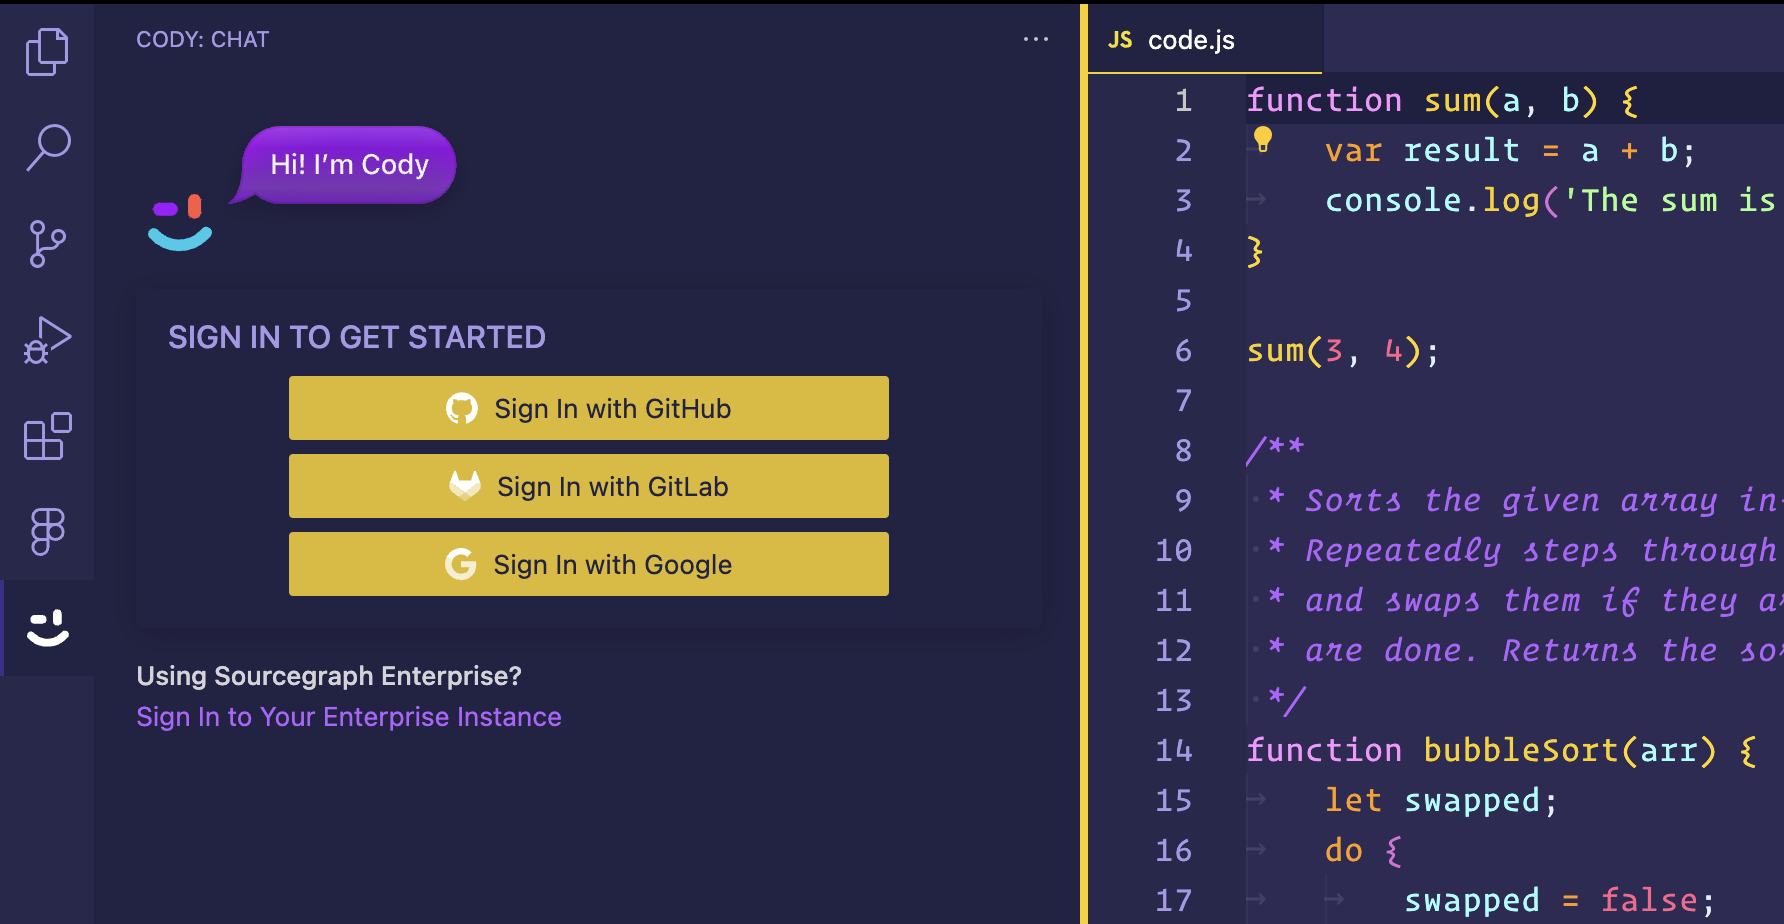
Sourcegraph Enterprise Cody Users
Sourcegraph Enterprise users should connect Cody to their Enterprise instance by clicking Sign In to Your Enterprise Instance.
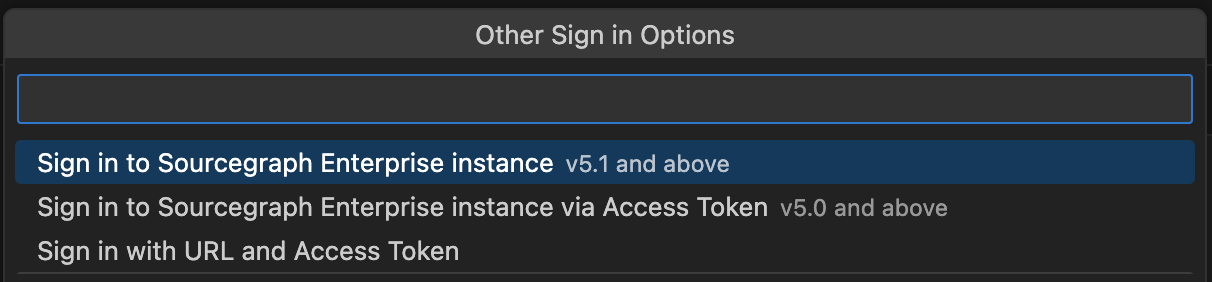
You'll be prompted to choose how to sign-in, select Sign In to Sourcegraph Instances v5.1 and above.
Enter the URL of your Enterprise instance. If you are unsure, please contact your administrator.

A pop-up will ask if you want to Open the URL in a new window. Click Open to open the URL in a new window.

Sign in to your instance. If you do not yet have a login, please contact your administrator.

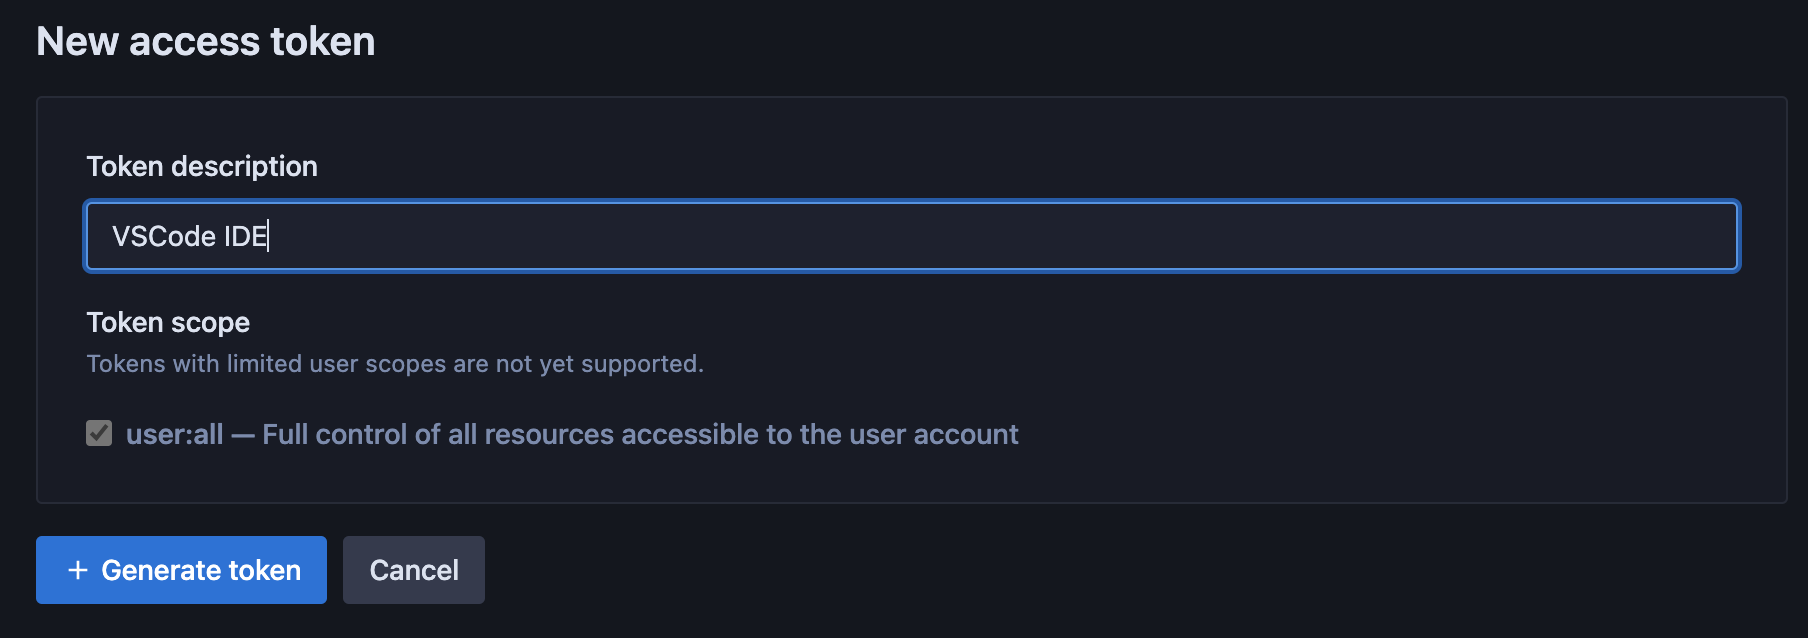
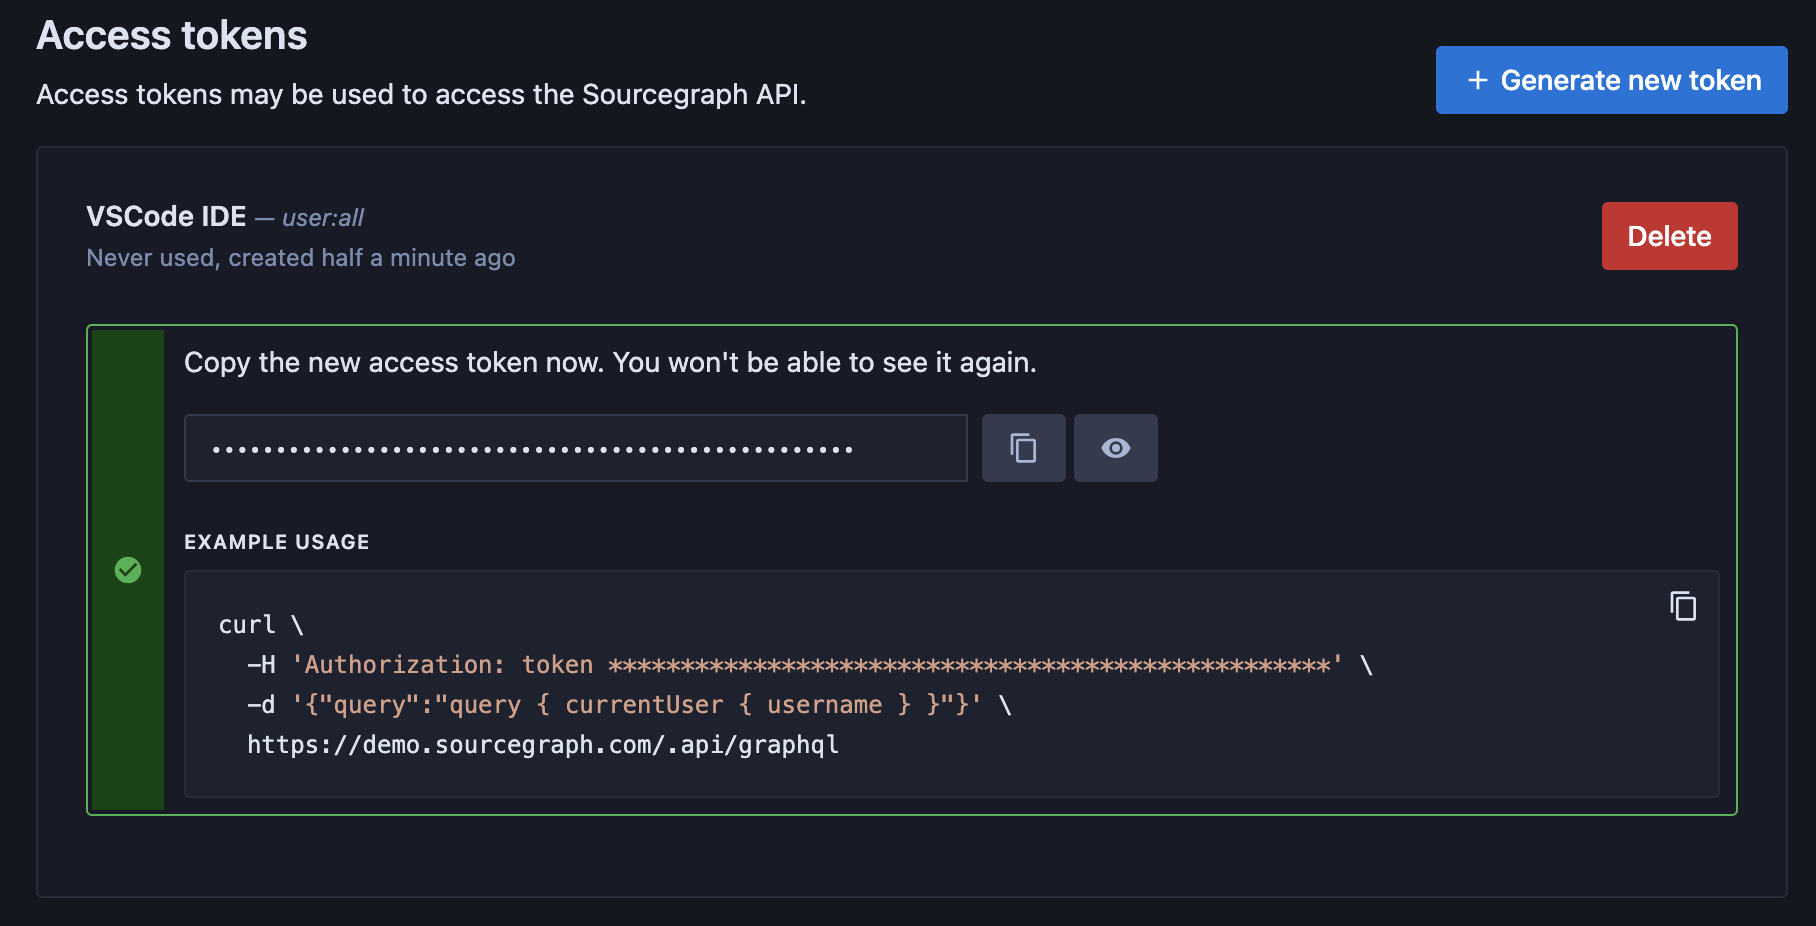
Create an access token from Account Settings - Access Tokens. Click + Generate new token

Name the token and click + Generate token.
Copy the token and return to VSCode.
Again, click Sign In to Your Enterprise Instance and choose Sign In to Sourcegraph Instances v5.1 and above. Enter the URL of your instance.
You should now be prompted to authorize Sourcegraph to connect to your VSCode extension using the token you created. Click Authorize.

Finally, you will be asked to allow the extension access. CLick Open.

VSCode should now display the Cody panel and you're ready to go.
Verifying the installation
Once connected, click the Cody icon from the sidebar again. The Cody extension will open in a configurable side panel.
Let's create an autocomplete suggestion to verify that the Cody extension has been successfully installed and is working as expected.
Cody provides intelligent code suggestions and context-aware autocompletions for numerous programming languages like JavaScript, Python, TypeScript, Go, etc.
- Create a new file in VS Code, for example,
code.js - Next, type the following algorithm function to sort an array of numbers
function bubbleSort(array){

}-
As you start typing, Cody will automatically provide suggestions and context-aware completions based on your coding patterns and the code context
-
These autocomplete suggestions appear as grayed text. To accept the suggestion, press the
Tabkey
Chat
Cody chat in VS Code is available in a tab next to your code. Once connected to Sourcegraph, a New Chat button opens the chat window on the right. You can have multiple Cody Chats going simultaneously in separate tabs.
All previous and existing chats are stored under the chats panel on the left. You can download these to share or use later in a .json file, or delete them altogether.
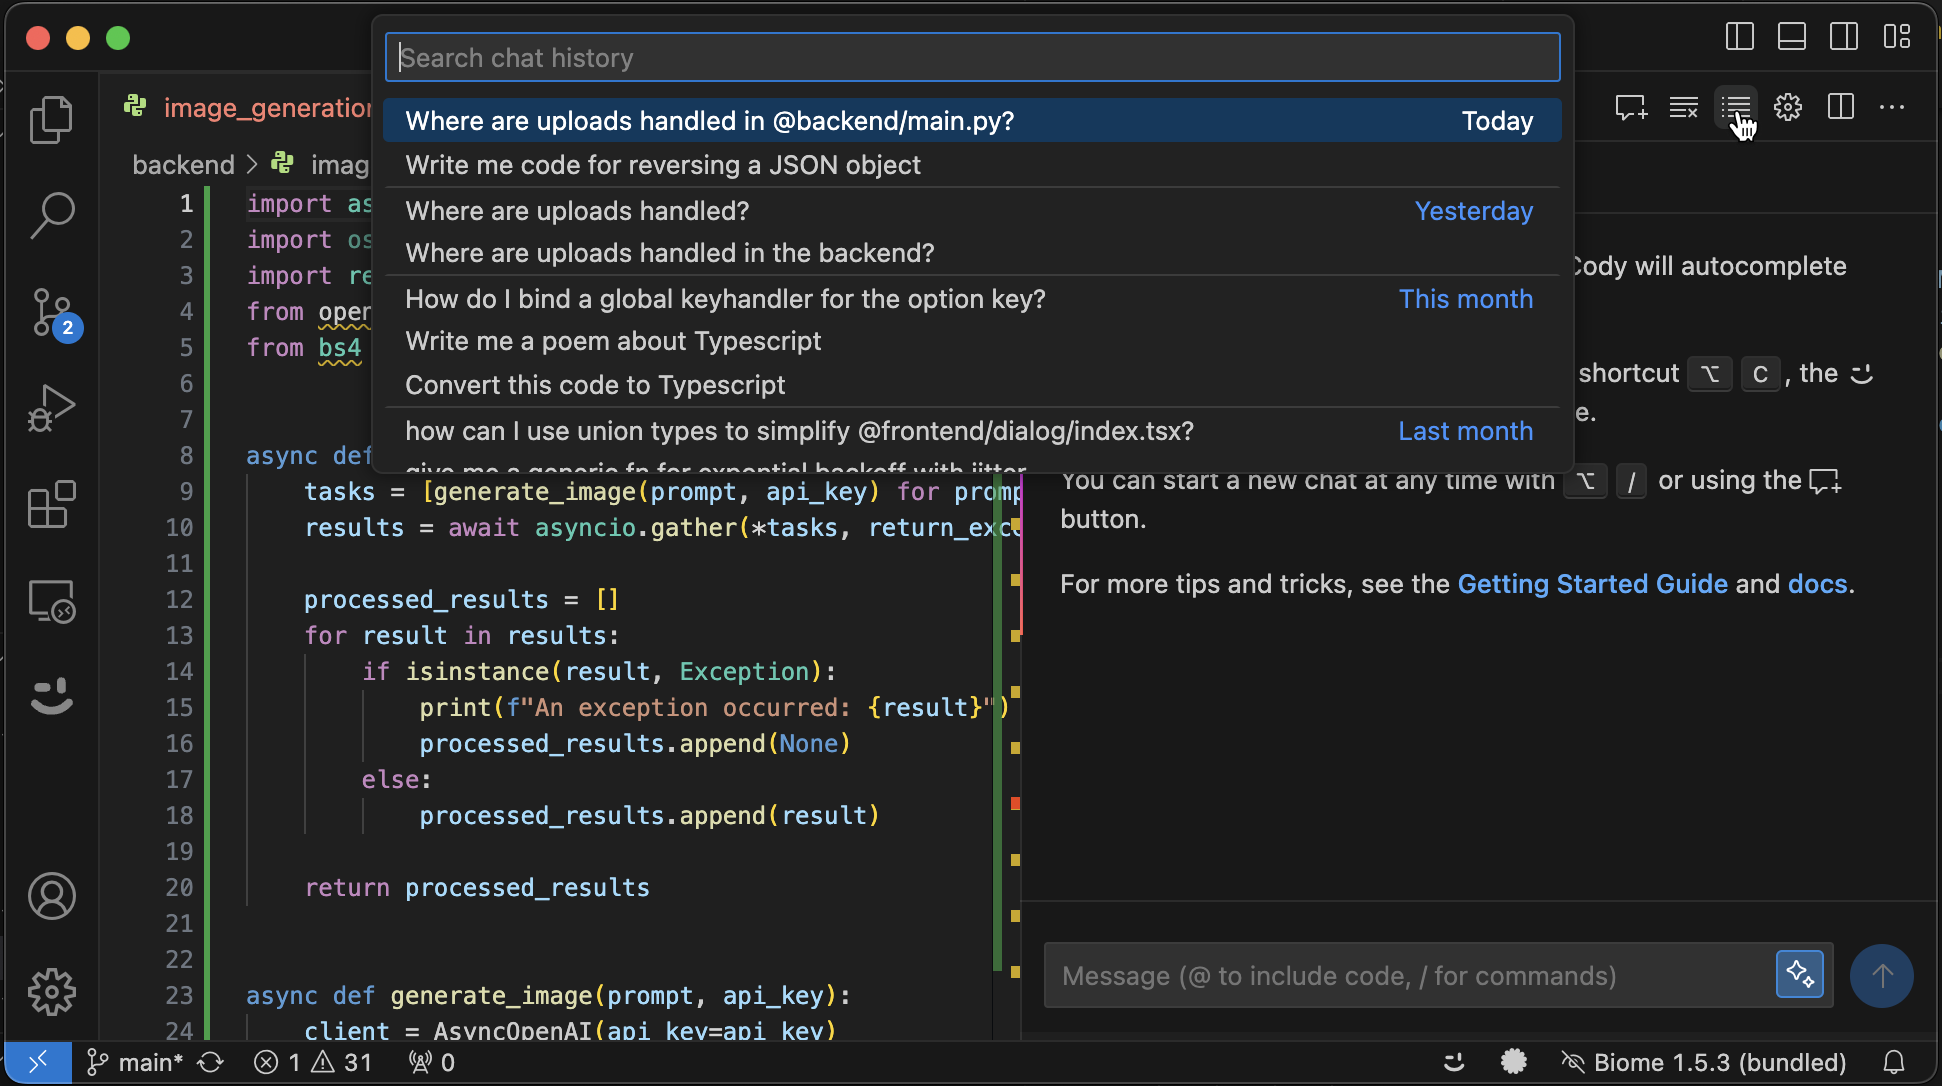
Chat history
There is a Chat History button at the top of your chat tabs, so you can navigate between chats (and search chats) without opening the Cody sidebar.
Chat interface
The chat interface is designed intuitively, which makes it easier to edit chat messages or start a new chat quickly. You can hit Enter to edit your message immediately without waiting for the stream to finish. This allows for quicker experimentation and iteration and less dependence on sending follow-up messages to clarify your question (which can also fill up your chat's context window).
Context fetching mechanism
VS Code users on the Free or Pro plan can leverage local context (local keyword search) as the primary context source for Cody chat with access to local embeddings. Remote embeddings will no longer be produced or used as a context source.
Enterprise users can leverage the full power of the Sourcegraph search engine as the primary context provider to Cody.
Context scope
VS Code users on the Free or Pro plan get single-repo support and can use one repo for context fetching. Enterprise users get multi-repo support and can explicitly specify up to 10 additional repos they would like Cody to use for context.
Enhanced Context Selector
Cody's Enhanced Context enables Cody to leverage search and embeddings-based context. Community users can generate local embeddings for their projects by clicking the icon next to the chat input. Users can also disable Enhanced Context or configure more granular control of Cody’s context by including @-files or @#-symbols in the chat input. This feature only supports local files and paths relative to your workspace. Start typing @, and Cody will suggest files for you to include.
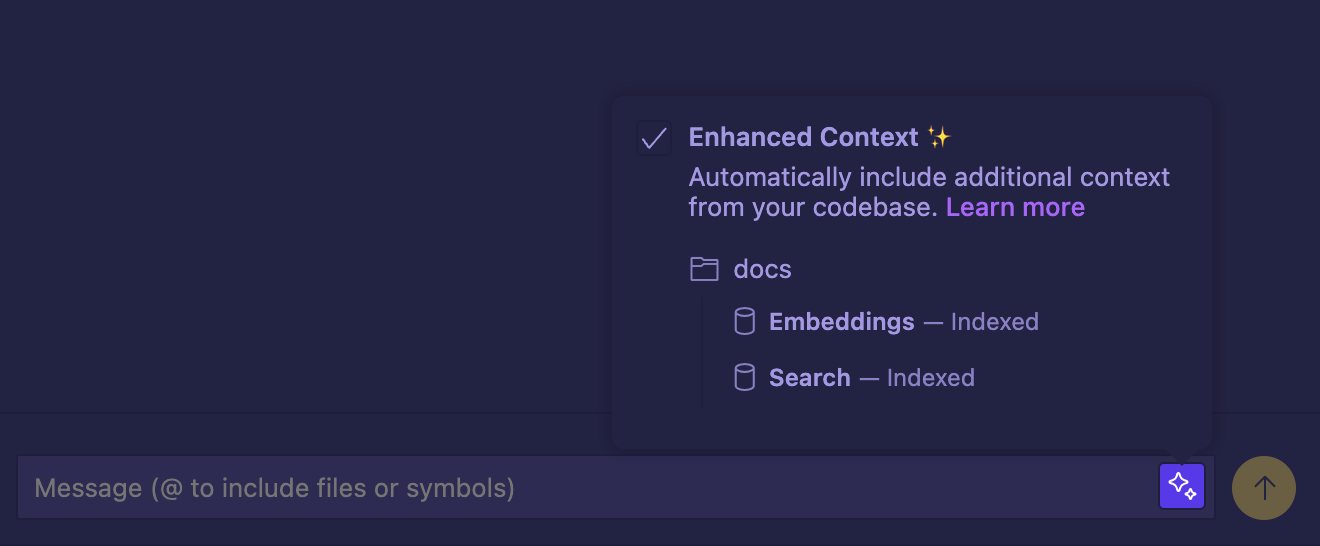
The following tables shows what happens when Enhanced Context Selection is enabled or disabled.
| Opened Files | Highlighted Code | Embeddings (If available) | Search (as backup) | ||
|---|---|---|---|---|---|
| Enhanced Context Enabled | ✅ | ✅ | ✅ | ✅ | |
| Enhanced Context Disabled | ❌ | ❌ | ❌ | ❌ |
LLM Selection
Cody Free users get chat responses supported by Claude 2.0. Cody Pro users can choose the LLM from a drop-down list they'd like Cody to use for chats. For Enterprise users, the administrator determines the LLM, and cannot be changed within the editor.

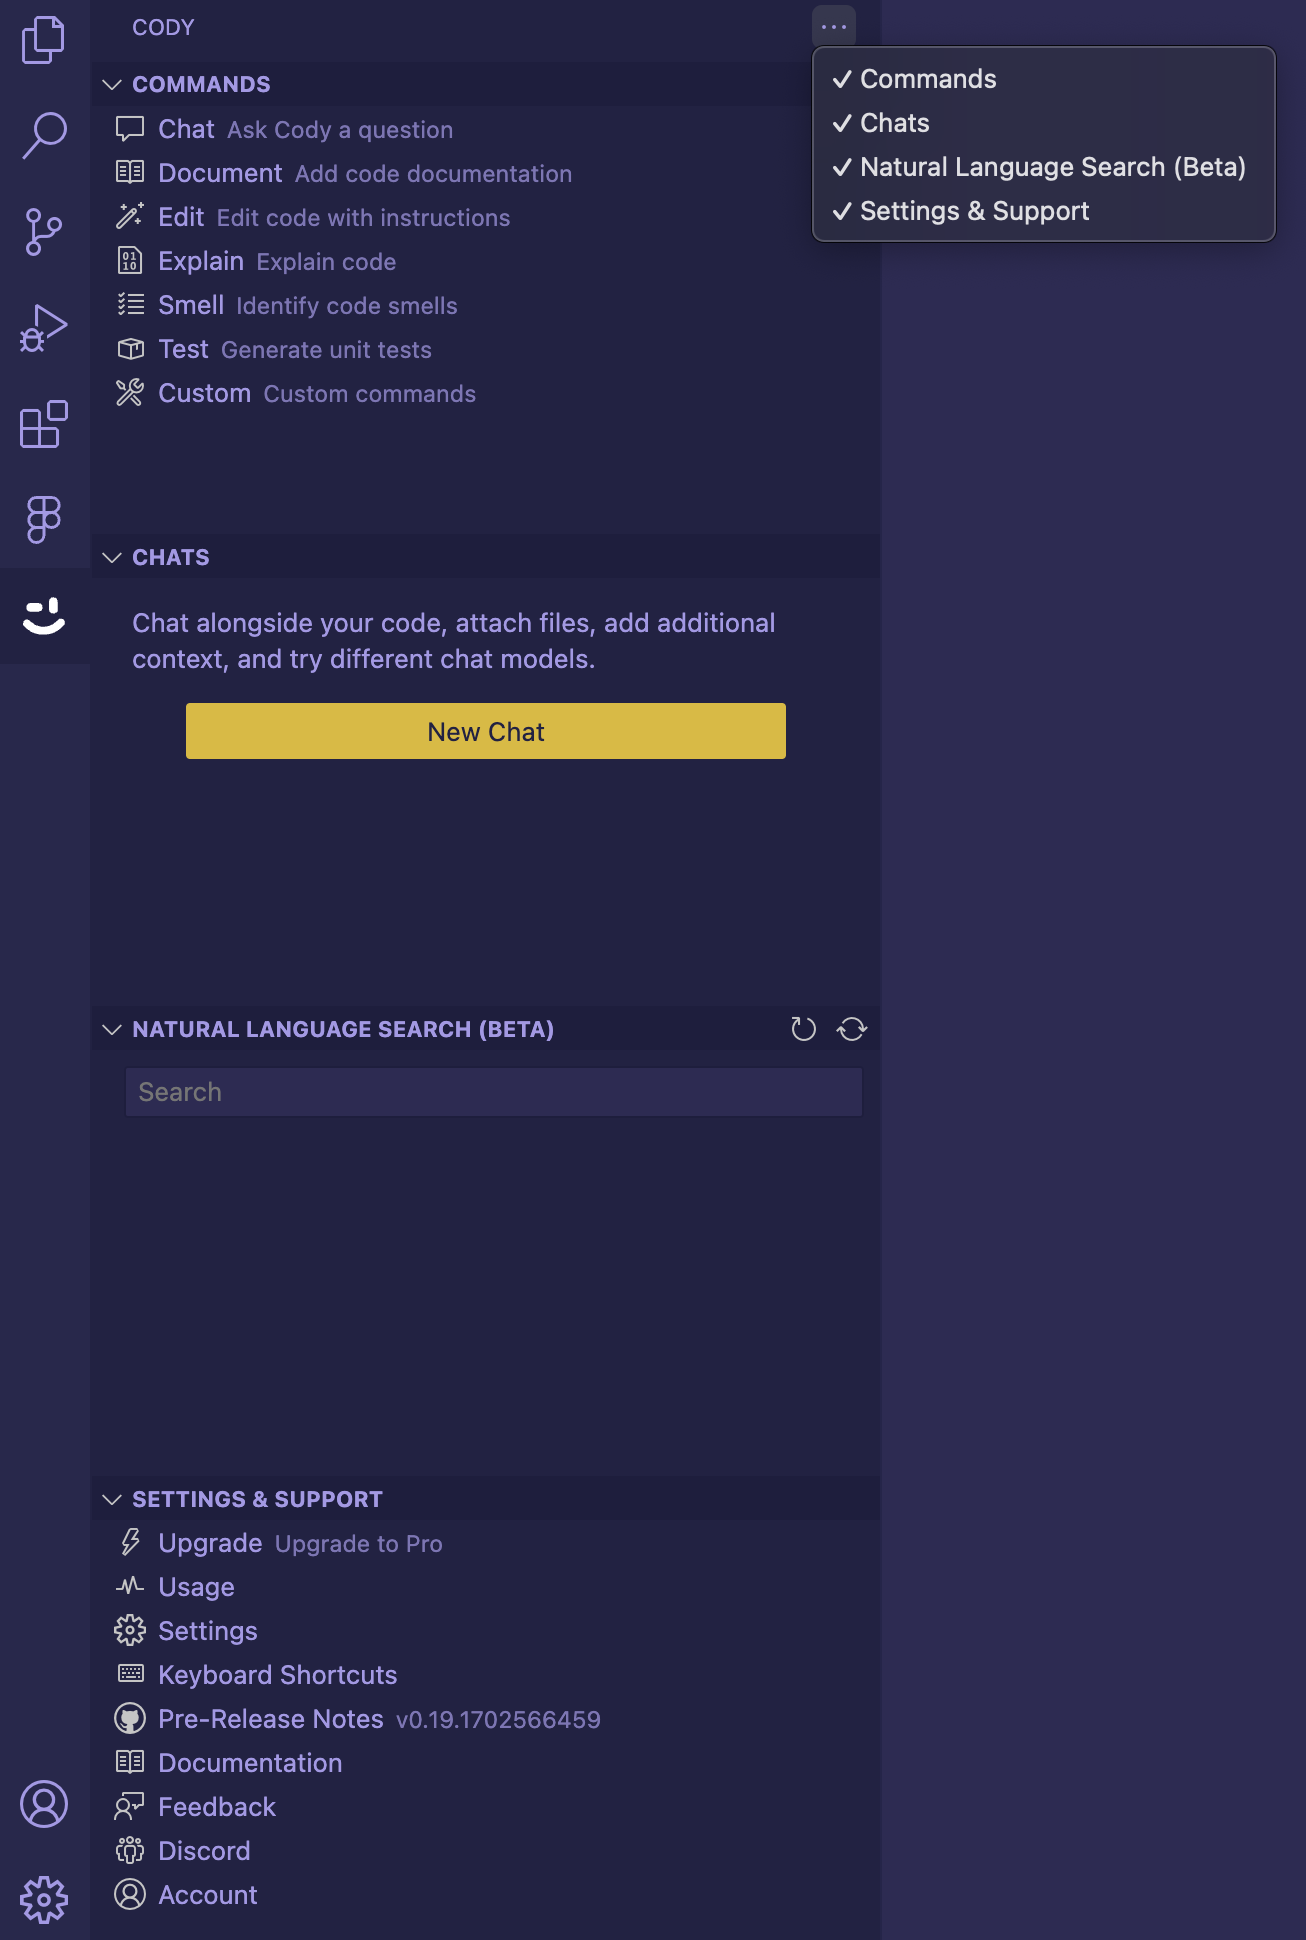
Commands
Cody offers quick, ready-to-use Commands for common actions to write, describe, fix, and smell code. These allow you to run predefined actions with smart context-fetching anywhere in the editor, like:
- Ask Cody a question
- Add code documentation
- Edit code with instructions
- Explain code
- Identify code smells
- Generate unit tests
- Custom commands
Let's understand how the /doc command generates code documentation for a function.
Custom Commands
For customization and advanced use cases, you can create Custom Commands tailored to your requirements. Custom Commands are currently supported by Cody for the VS Code extension version 0.8 and above.
Learn more about Custom Commands here →
Cody VS Code Actions
Cody VS Code extension users can also use the Code Actions feature to fix, explain, and edit code. These Code Actions are triggered by the following:
- Ask Cody to Fix
- Ask Cody to Explain
- Ask Cody to Edit
These Code Actions can be initiated by clicking the lightbulb icon in your code file. Highlight a selection of code or click on the red error warnings that indicate a syntax error and use the lightbulb icon to open Cody QuickFix options.
- Select Ask Cody to fix option
- A Cody is working notice will appear
- Once the fix has been applied, the Code Lens will display options to view the diff (Edits Applied), Retry, Undo, or accept the fix (Done)
Here's a demo that shows how Code Actions work to fix an error:
A similar process applies to explain and edit Code Actions.
Cody Natural Language Search
Cody's Natural Language Search is an AI-powered code search that allows users to input a natural language search query and look for it within their project. For example, "password hashing" or "connection retries".
In the left-hand panel, type your queries in the Search field, and the search results are displayed. You can select one of the search results and verify that the correct file opens in a new tab. Natural Language Search works for all Cody users with the ability to search across your entire local codebase from within the IDE.
Updating the extension
VS Code will typically notify you when updates are available for installed extensions. Follow the prompts to update the Cody AI extension to the latest version.
Authenticating Cody with VS Code forks
Cody also works with Cursor, Gitpod, IDX, and other similar VS Code forks. To access VS Code forks like Cursor, select Sign in with URL and access token and generate an access token. Next, copy and paste into the allocated field, using https://sourcegraph.com as the URL.